I am always trying to find a gift with meaning that my toddler can give to his grandparents or his dad for father’s day. I love having keepsake items that will help us remember Rhett’s toddler years and found this idea to do a stepping stone craft for the garden with his hand or footprints. That way we can keep and remember them forever. We had such a fun time making this craft and getting messy and now I want to do this every year!
DISCLAIMER: This post contains affiliate links. Which means I might be compensated for purchases made from these links at no additional cost to you. I am not responsible for any actions taken from my advice, all ideas and opinions on this post remain my own.
Supplies
This craft only takes a few supplies and I got everything from amazon or my local ACE Hardware
- 1 ten pound bag of concrete mix
- stirring stick (I used a paint stirring stick, it broke into many pieces while doing this so I recommend something that can handle concrete)
- 2 12 inch plastic flower pot bases
- garden hose
- 10 gallon bucket (or bucket you don’t care to throw away or get dirty)
- stone stamps (found HERE) OR for a different font, click here
- sandpaper (I used 80 grit) one sheet is plenty

Something else we did that I won’t include in supplies since it is totally up to you- are the shells we found on vacation at Hilton Head. Rhett had a ton of fun collecting them and showing them off. I thought that would be a fun way to help remember our trip and what year he went to the beach for the first time!
Some other things you could use- marbles, beads, decorative rocks, anything that will withstand the weather from being outside and being stuck in concrete!
Steps
- Step 1: gather all your supplies and get everything ready to go before you get your child involved. If your kid is like mine and loves to help do everything, sometimes that can end in chaos and since I am super pregnant I just needed this to be as easy as possible. Also- this is 100% an outdoor activity- since there is wet concrete involved- I would recommend choosing a spot you don’t really care if some extra concrete ends up
- Step 2– pour your dry concrete mix into large bucket and add appropriate amount of water. (It will tell you measurements on the bag) I realized after I poured my first stone that I wanted the consistency a little thinner so I ended up adding more water for the second. Mix well!
- Step 3– Lay out your flower pot holders and pour the concrete into both- Fill up most of the way but not enough where it is overflowing
- Step 4– Now the fun part! Add little foot or hand prints in the middle. I did one of each, if doing it with a very little one I would probably stick with feet. You have more control over the foot placement, they might want to ball up their hands at the last minute and you have to smooth it over and do it again.
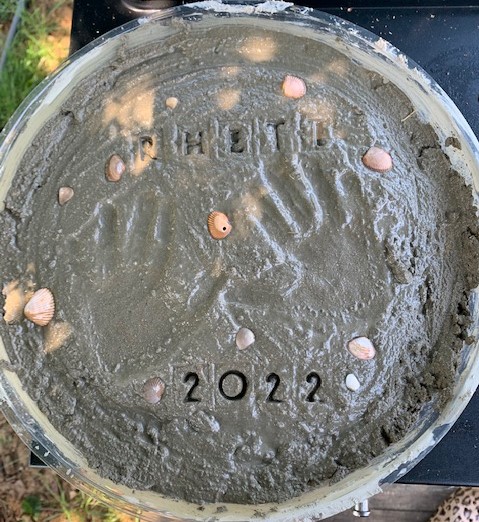
- Step 5– Use your stone stamps to write out the date and your child’s name- and whatever else you want to write.
- Step 6– Add your decoration. This is when Rhett put his shells in the concrete which was super fun for him.
- Step 7– Let it dry! I let it set up for a whole day before taking it out of the plastic containers, just didn’t want to take any chances.
- Step 8– Sand the edges. There will be rough spots and uneven areas after removing from the plastic so I used sand paper to clean up the edges and then you’re done!
Things I will do differently next time
So these turned out so cute but this was my first time experimenting with making the stepping stones and I definitely learned from some mistakes.
I will probably use smaller flower pot trays next time. The 12 inch worked with doing two hands or two feet but they were a little too wide to be as thin as they were and I am worried about them breaking if moved too often.
When I did the letters and foot or handprints especially on the more liquid stepping stone, I did it right away which was a mistake. I had to re-do the letters once the cement set up a little more. Next time I’ll wait a while before doing that step to make everything show up better.

I’ll use a different stirring stick. The wooden paint stirrer was way too flimsy and broke on me a few times. Next time I’ll use something a little more durable and then wash it off right after.
Other than those few things I loved how this craft turned out. It was simple, fun for Rhett and a great way to remember his little 2 year old hand and footprints for years to come. I am excited to do this every year and add to ours and my dad’s garden collection. Next year we will have two more little feet to make too!
If you have made a stepping stone craft with your kids I’d love to see what creative ideas you came up with! Post an image in the comments, I’d love to try new ideas!